Setting up External Authentication
Hopp supports OpenID Connect providers, such as Microsoft Entra ID (formerly known as Azure Active Directory).
The Hopp Portal offers three identity providers:
- Form: Application sign-in form
- Windows: Windows NTLM Negotiation
- External: External OpenID identity provider
By utilizing an external identity provider like OpenID, you centralize user management. This means fewer passwords for users to remember and less administrative overhead for account creation, deletion, and password resets.
When setting up the Hopp Portal to use an external identity provider, there are 2 alternatives.
- Authentication only
- Authentication and user management
Authentication only
The simplest alternative uses the external provider only to authenticate users. Users and their roles are created and managed in the Portal, as with the sign-in form or NTLM Negotiation; only the sign-in experience differs.
To use this option, set UserManagement to "Portal" on the wizard's Authentication page. This is the default.
The seed administrator you name on the wizard's Authentication page is the first account. Enter the email address the identity provider sends for that person: it becomes the account's user name, and any other value is refused at sign-in.
Authentication and user management
A more elaborate alternative moves the management of users and roles out of the Portal to the external provider. It suits larger organizations that already manage users centrally.
- Most actions on users in the Portal are disabled, because your organization's identity provider manages them.
- A user authorized for the Portal in the identity provider can sign in. The Portal creates their user profile at the first sign-in, so Hopp administrators do not create accounts by hand.
- The Portal updates a user's profile and role from the identity provider each time the user signs in, so changes made there reach the Portal at the user's next sign-in.
To use this option, set UserManagement to "External" on the wizard's Authentication page.
There is no seed administrator in this mode: the first user whose role maps to administrator signs in as one.
Configuring the Portal for an external identity provider
You select the External identity provider on the Authentication page of the
configuration wizard (see Setting up the Master Server).
The wizard writes the settings to the Portal's configuration store at
%ProgramData%\HoppTech\Portal\appsettings.portal.json, under the Authentication
section, where you can also review or hand-edit them. Settings in this file override those in the
appsettings.json installed with the Portal. After editing the file by hand, restart the Hopp Portal Windows Service: the
Portal reads these settings only when it starts.
The External provider settings live under Authentication:OpenIdConnect:
"Authentication": {
    "IdentityProvider": "External",
    "OpenIdConnect": {
        "Authority": "(the URL of the identity provider)",
        "ClientId": "(the Portal client ID registered with the identity provider)",
        "ClientSecret": "(the client secret)",
        // UserManagement selects who owns users and roles:
        // - "Portal": manage users and roles in the Portal; the external
        //    provider is used only for sign-in
        // - "External": defer creation and management of users to the identity provider
        "UserManagement": "Portal",
        // Optionally map external role names to the roles Hopp uses
        "RoleMapping": {
            "admin": "administrator",
            "external_role_2": "operator"
        },
        // Optional: the claims the Portal reads (defaults shown)
        "EmailClaimType": "email",
        "RoleClaimType": "roles",
        "DisplayNameClaimType": "name",
        // Optional: also fetch the claims from the userinfo endpoint
        "CallUserInfoEndpoint": false
    }
}
Authority is the identity provider's issuer URL and must use https: the Portal refuses to read the provider's discovery
document over plain HTTP.
The wizard does not show the claim settings, CallUserInfoEndpoint or DebugExternalAuthLogging; add them to
appsettings.portal.json by hand when you need them. Saving the wizard's Authentication page keeps them,
unless you switch the page to another identity provider: that clears the whole OpenIdConnect section.
Claims the Portal reads
The Portal signs a user in by their email address, which is also the user's user name, and, when UserManagement is "External", assigns their role from a role claim. By default it reads these claims from the ID token:
| Setting | Default | Used for |
|---|---|---|
EmailClaimType | email | The user's email address and user name. Sign-in fails if it is missing. |
RoleClaimType | roles | The user's roles, when UserManagement is "External". |
DisplayNameClaimType | name | The user's display name. If it is missing or blank, the email address is used. |
If your identity provider uses other claim names, set the matching setting to the name it uses. For instance, a provider that
sends a single role claim needs RoleClaimType set to role.
A setting left empty uses the default.
The Portal reads a claim only at the top level of the token: it cannot read a claim nested inside
another one.
If your identity provider does not put all of these in the ID token, set CallUserInfoEndpoint to
true. The Portal then also fetches them from the provider's userinfo endpoint:
| From the userinfo endpoint | Effect on the ID token's claims |
|---|---|
| Email address and display name | They replace the token's, even when sent blank: a blank display name falls back to the email address, and a blank email address fails the sign-in. |
email_verified with the email address | It replaces the token's. |
A different email address without email_verified | The token's email_verified is dropped, because it describes the old address. |
The same email address without email_verified | The token's email_verified is kept. |
| Roles | They are added to the token's roles; they do not replace them. |
The email_verified rows apply only when EmailClaimType is email; with any other email claim the Portal does not read
email_verified.
If the identity provider reports that a user's email address has not been verified (the
email_verified claim is false), sign-in is refused, because the Portal identifies users by
their email address. Identity providers that do not send email_verified are not affected. Keycloak, for instance, sends false
for a user whose Email verified is off.
email_verified describes the email claim only, so the check applies only when EmailClaimType
is email. If you set it to another claim, make sure users cannot change that claim's value
themselves at the identity provider.
A user whose email address is longer than 50 characters, or contains a character other than the letters A to Z, digits
and - . _ @ + \ (for instance an apostrophe, as in o'brien@example.com), cannot use the Portal through the identity
provider. With UserManagement "External", the sign-in ends on a bare error message and no account is created. With
"Portal", an administrator cannot create the account, so the user is refused at sign-in. With EmailClaimType set to
preferred_username, it can also hit Microsoft Entra ID guests: a guest's user principal name contains #EXT#. The fix planned
for 2.7.1 lets the Portal accept email addresses up to 256 characters and the characters ' ! # ^ ~; any other character,
for instance a letter such as æ, will still be refused, with a message instead of an error.
Display name
The Portal updates a user's display name from the identity provider at each sign-in, with either UserManagement setting. A display name longer than 50 characters is cut to 50.
Any account created while the identity provider is External gets its email address as display name, including an account an administrator creates in the Portal (the display name they enter is replaced). The display name from the identity provider replaces it at the user's next sign-in: the first sign-in for an account an administrator created, the second for an account the Portal created at the first sign-in. A fix is planned for 2.7.1.
How the Portal finds a user's account
The Portal finds the account by the user's email address, through the account's external sign-in. An account gets its external sign-in when it is created while the identity provider is External: by an administrator in the Portal, or by the Portal itself at the user's first sign-in. This means:
- An account created while the Portal used Form or Windows sign-in is not found, even when it has the same email address. Before such a user signs in through the external provider, delete the old account; changing its email address is not enough when its user name is the same address. With UserManagement "Portal", then create the account again in the Portal; with "External", the Portal creates it at the first sign-in. The new account starts without project memberships: add it to the projects the old one belonged to.
- If a user's email address changes in the identity provider, the Portal no longer finds their account. With UserManagement "Portal", the user is refused until an administrator creates an account for the new address. With "External", the Portal creates a new account for the new address, and the old account stays as it was.
Because the Portal trusts the email address to identify the account, the email attribute in your identity provider must be
controlled by your directory, not editable by the users themselves. Microsoft Entra ID, for instance, does not send
email_verified, so the check above never refuses an Entra ID user.
Role mapping
When UserManagement is "External", the identity provider manages users and their roles.
Hopp operates with these roles (see Hopp Portal User Roles):
- administrator
- operator
- manager
- team
- external
Normally you create these roles for the Portal application in the identity provider, and no RoleMapping is needed. If the provider must use other role names, RoleMapping maps them to the Hopp role names.
On the wizard's Authentication page, tick Customize role mappings and list, for each Hopp role, the provider role names that should grant it (separate several with a comma). A provider role can grant only one Hopp role. The wizard writes these as the RoleMapping section shown above; leave the editor off to use the provider's role names directly.
How the Portal assigns a role:
- Without a RoleMapping, the role names from the identity provider are used directly as Hopp role names. They must match exactly,
in lower case: a provider role called
Administratorgrants nothing. - With a RoleMapping of at least one entry, only the roles listed in it count. A provider role or group that is not listed grants nothing, even when it is spelled like a Hopp role name, so list every provider role that should grant access. The names on the left of RoleMapping match the role names from the identity provider regardless of upper and lower case.
- The values on the right of RoleMapping must be one of the Hopp role names above, in any casing. If a value names no Hopp role,
for instance
admin, the Portal does not start: it returns to the setup wizard, and its log names the RoleMapping entry to correct. - Roles are read from the claim named by
RoleClaimType(defaultroles). A user with no role that maps to a Hopp role is refused at sign-in. - A user gets one Hopp role: when several of their roles map to a Hopp role, the highest in the order administrator, operator, manager, team, external is used.
- The role is applied again at every sign-in, so it replaces a role an administrator has set for the user in the Portal.
Some identity providers do not put roles at the top level of the token. Keycloak, for instance, sends realm roles nested under realm_access and client roles
under resource_access. The Portal cannot read a nested claim, so configure the provider to also send the roles in a top-level
claim. In Keycloak, add a mapper to the Portal client's dedicated scope: a User Realm Role mapper for realm roles, or a User Client Role mapper
for client roles (with Client ID set to the Portal client). Set Token Claim Name to roles, turn Multivalued on and turn Add to ID token
on (or Add to userinfo, together with CallUserInfoEndpoint).
Enabling debug logging for OpenID Connect
To troubleshoot authentication issues, you can enable debugging logs by adding the "DebugExternalAuthLogging": true
option to the Authentication:OpenIdConnect section in the appsettings.portal.json:
"OpenIdConnect": {
    // ... other configuration
    "DebugExternalAuthLogging": true
},
When enabled, debug logs will output the contents of the ID token and access token, and the claims, which can help diagnose authentication and authorization issues.
The Portal writes these entries at Debug level, and its log keeps only Information and above by default, so also lower the log level for the
controller that writes them. Add this to appsettings.portal.json, next to the Authentication section:
"Serilog": {
    "MinimumLevel": {
        "Override": {
            "MigFx.Portal.Server.Controllers.ExternalAuthorizationController": "Debug"
        }
    }
},
Restart the Hopp Portal Windows Service for both changes to take effect.
Debug logging should only be used for troubleshooting purposes in development or staging environments. Do not enable this in production, as it may expose sensitive authentication tokens and user information in logs.
Troubleshooting sign-in
A user who is refused sees the reason on the Portal's sign-in page. The Portal's log has more detail; to see exactly which claims the identity provider sends, turn on debug logging. Messages are quoted as shown; a value in parentheses is filled in by the Portal.
| Message on the sign-in page | Cause and fix |
|---|---|
| "The email claim is required but was not found in the identity provider response." | The Portal found no email address: the claim named by EmailClaimType is missing or empty. With CallUserInfoEndpoint, the userinfo answer replaces the token's value, so check both. Configure the identity provider to send the address, or set EmailClaimType to the claim it uses. |
| "The identity provider reports that the email address has not been verified." | The provider sends email_verified as false for this user. Verify the address at the identity provider. |
| "Failed to authenticate. No Role claim found on the external idp user" | UserManagement is "External" and the token has no claim named by RoleClaimType. Give the user a role at the identity provider, and check that RoleClaimType names the claim it sends. |
| "Failed to authenticate. Role claims could not be mapped to a valid Hopp role" | The user's roles do not map to a Hopp role. Without RoleMapping, they must be Hopp role names in lower case; with RoleMapping, only the roles listed in it count. See Role mapping. |
| "Failed to authenticate: User (the user's email address) is not authorized to use the Hopp Portal" | UserManagement is "Portal" and there is no account for this email address with an external sign-in. Create it in the Portal; see How the Portal finds a user's account. |
| "Authentication failed: User not found." | The account was found or created, but was gone when the Portal looked it up again, for instance deleted at that moment. Check the account in the Portal and the Portal's log. |
| "Sign-in was cancelled or declined at the identity provider." | The identity provider answered access_denied: usually the user cancelled or declined the consent prompt, but some providers also answer this when they refuse the user themselves. The Portal's log shows only access_denied; the provider's own sign-in log has the reason. |
| "Sign-in with the external identity provider failed. Please contact your Hopp Portal administrator." | The identity provider returned an error, or the Portal could not complete the sign-in with it: for instance a wrong or expired client secret, or a lost sign-in cookie after the browser's back button or a long wait at the provider. The Portal's log names the reason. |
| "Failed to authenticate with the external identity provider." | Shown when the sign-in page is reloaded after any of the messages above (the specific message is shown only once), and when the Portal cannot read the sign-in result. Ask the user to open the Portal's address again and report the message they get, or read the Portal's log. |
Example: Microsoft Entra ID configuration
The Hopp Portal can be configured to use any OpenID External Identity Provider. Here is a sample on how to create a client application in Microsoft Entra ID (formerly known as Azure Active Directory) and configure the Portal to use it.
This example configures Entra ID for UserManagement "External". With "Portal", skip the Roles and Enterprise Application steps: roles come from the Portal account, and every user still needs an account there.
-
App Registration:
-
Go to the Azure portal and navigate to "App registrations" to create a new app registration.
-
Under "Supported account types", select Single tenant only (accounts in this organizational directory only).
-
Under the "Redirect URI" section, select the type as "Web."
-
Set the URL to
https://(Portal Url)/external-logincallback, with the hostname in lower case. The wizard's Authentication page shows the value with the Portal URL as it was typed; lower-case its hostname even when the server's name has upper-case letters. Browsers send the hostname in lower case, so the URI the Portal sends has it in lower case too, and an identity provider that compares the registered URI including case refuses any other. If Entra ID refuses with a redirect URI mismatch (AADSTS50011), its error page shows the URI the Portal sent, built from the address the request reached the Portal at. If it matches the wizard's value apart from case, register it here. If it differs, find out why rather than registering it: users may reach the Portal at another address than its configured Portal URL (sign in at that URL, or change it), or, for instance withhttp://localhost:5000/external-logincallback, a reverse proxy's forwarded headers do not reach the Portal or are not trusted (make the proxy send them, and check the Portal's reverse proxy settings in the configuration wizard).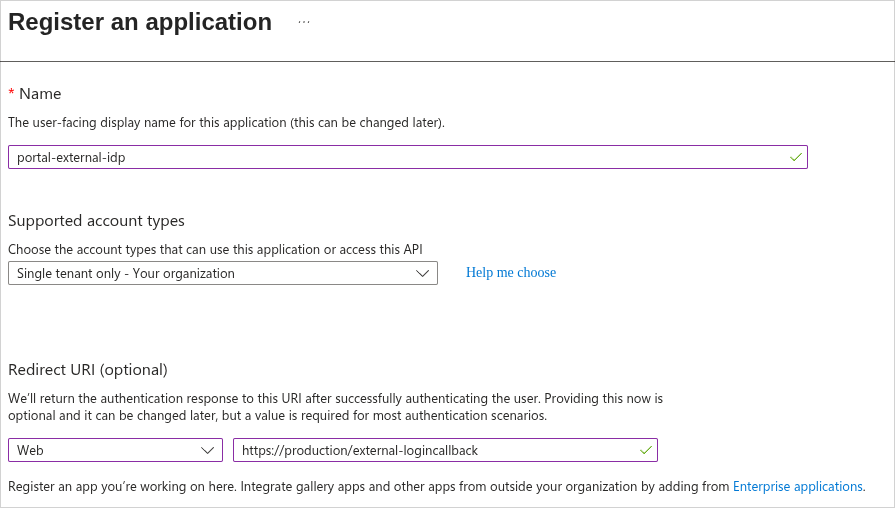
-
-
Overview
-
Under “Overview” copy the Application (client) ID. This will be used as the ClientId.

-
Copy the Directory (tenant) ID. Use this for the Authority. For a single tenant app registration in Entra ID, the authority url is
https://login.microsoftonline.com/{Tenant ID}/v2.0
-
-
Credentials:
-
Under "Certificates & secrets," generate a new client secret. Copy the “value” of the secret. This will be used as the ClientSecret.

-
A client secret expires. Note the date, and before it passes, create a new secret, enter it as the ClientSecret (with Reconfigure, or in
appsettings.portal.json), and restart the Portal service: the Portal reads the secret only when it starts. Once the secret has expired, the Portal cannot complete a sign-in with Entra ID, and every user is refused with "Sign-in with the external identity provider failed". Unless an administrator is still signed in, nobody can reach Reconfigure by then, so edit the file.
-
-
API permissions:
- Under "API permissions", add the Microsoft Graph delegated permissions openid, profile and email.
-
Token configuration:
- The email address needs no optional claim: the Portal asks for the
emailscope, so Entra ID sends the address in the ID token. It sends it only for a user that has an email address; a user without one is refused with "The email claim is required but was not found in the identity provider response." - If some users have no email address, set
EmailClaimTypetopreferred_usernameinappsettings.portal.jsoninstead. Entra ID usually sends the user principal name (the name users sign in to Microsoft with) in that claim, but not always: with email as an alternate login ID, a user who signs in with another email address gets that address in it. The Portal finds the account by this value (see How the Portal finds a user's account), so a different value refuses an existing user or, with UserManagement "External", creates a second account. A user principal name that equals the email address is therefore not enough on its own: before you rely on this claim, check with debug logging that the value Entra ID actually sends is the address the Portal account uses, for each kind of user and each way they sign in.
- The email address needs no optional claim: the Portal asks for the
-
Roles
- Under "App roles", create an app role for each Hopp role users should get: administrator, operator, manager, team and
external. The role's Value is what Entra ID sends in the
rolesclaim, so it must be the Hopp role name, or a name on the left of RoleMapping when you use one.
- Under "App roles", create an app role for each Hopp role users should get: administrator, operator, manager, team and
external. The role's Value is what Entra ID sends in the
-
Enterprise Application
- In the Azure portal, navigate to "Enterprise apps" and find the Enterprise Application with the same name corresponding to the App Registration just created.
- Go to “Users and groups” and assign users to the app roles previously created. Whether a group can be assigned instead
depends on your organization's Entra ID license; where it cannot, Entra ID offers individual users only. With UserManagement
"External", every user needs an app role: a user assigned with "Default Access" gets no
rolesclaim and is refused with "Failed to authenticate. No Role claim found on the external idp user".
-
Security groups instead of app roles
-
With UserManagement "External", users can get their role from their Entra ID security groups instead of app roles. Use one or the other: the Portal reads roles from one claim. With groups, skip the Roles step and the app-role assignment in the Enterprise Application step.
-
Under "Token configuration", select "Add groups claim", choose Security groups, and for the ID token choose Group ID. Entra ID then sends the object IDs of the user's groups in the
groupsclaim. -
In
appsettings.portal.json, underAuthentication:OpenIdConnect, setRoleClaimTypetogroupsand map each group's object ID to a Hopp role with RoleMapping. Groups not in RoleMapping grant nothing."RoleClaimType": "groups","RoleMapping": {"(object ID of the Portal administrators group)": "administrator","(object ID of the Portal operators group)": "operator"} -
Entra ID puts at most 200 groups in an ID token, nested groups included. For a user in more groups it leaves the
groupsclaim out altogether (see Microsoft's group claims limits), and the Portal refuses that user with "Failed to authenticate. No Role claim found on the external idp user". Where users are in many groups, choose Groups assigned to the application instead of Security groups, and assign the mapped groups to the Enterprise Application under "Users and groups": Entra ID then sends only those groups, for users who are direct members of them. Whether groups can be assigned to an application depends on your organization's Entra ID license.
-
Enter the ClientId, ClientSecret, and Authority on the wizard's
Authentication page (or in appsettings.portal.json) with the values from the
steps above.