Setting up an Execution Server
It is on the Execution Server that the Hopp migrations actually execute. The server hosts the databases that are used in the migration.
A characteristic feature of an Execution Server is that it has the Hopp Runtime Agent Windows Service installed. The service is responsible for launching the migration processes when requested via the Portal.
Install and configure the Portal on the Master Server, and make sure it is running, before you install the Runtime Agent. You create the Agent's Client ID and Secret on the Portal's Client Applications admin page, and the Agent contacts the Portal at startup to fetch its configuration, so the Portal must be up and reachable first.
Configure Folders
Recommended folder structure on Execution Server
- D:\MigFx
- Database: Database files for databases global to the Execution Server
- Runtime: The Runtime Agent service account must have full control access to this folder
- Track (one numbered sub folder pr track on the Execution Server)
- 01
- Database: Place the Hopp_01_Migration and Hopp_01_Staging database files here
- (The Runtime will automatically create other, required folders for the Track here)
- 02 …
- Database: Place the Hopp_02_Migration and Hopp_02_Staging database files here
- XX
- Database: Hopp_XX_Migration and Hopp_XX_Staging database files
- 01
- Track (one numbered sub folder pr track on the Execution Server)
Create Databases
Install SQL Server as per previous guidelines.
An Execution Server holds its Utility database and each track's Migration and Staging databases. The Utility and Migration databases are set up by the PowerShell database scripts; a Staging database is created by you and its schema is maintained by Hopp (see the overview in Setting up the Master Server).
NB: Please ensure that all databases are created with the same SQL Server collation.
-
Create database Hopp_Utility
-
Database files in D:\MigFx\Database
-
Apply the
UtilityDbdatabase scripts:./update-database.ps1 -Server <server> -Scripts UtilityDb -Database Hopp_Utility -RuntimeAgentUser DOMAIN\svc-hopp -PortalUser DOMAIN\svc-hopp
-
-
For each Track XX:
-
Note: In a setup where multiple execution servers are connecting to one database server, the track-specific databases below should be named accordingly (database name should include the name of the execution server)
-
Create database Hopp_XX_Migration
-
Database files in the D:\MigFx\Runtime\Track\XX\Database
-
Apply the
MigrationDbdatabase scripts:./update-database.ps1 -Server <server> -Scripts MigrationDb -Database Hopp_XX_Migration -UtilityDb Hopp_Utility -RuntimeAgentUser DOMAIN\svc-hopp -PortalUser DOMAIN\svc-hopp
-
-
Create database Hopp_XX_Staging
- Database files in the D:\MigFx\Runtime\Track\XX\Database
- (no setup script, database is maintained automatically by Hopp)
- Grant the Runtime Agent service account
db_owneron it yourself, and a separate Portal accountdb_datareader(a shared account getsdb_owner); see Granting db_owner by hand. The database scripts do not reach it - With SQL Server authentication this differs; see Accounts
-
Pass the same service accounts (-RuntimeAgentUser/-PortalUser) you use on
the other Hopp databases; they are what grants the Runtime Agent and Portal
access to each database. The examples pass one shared account, DOMAIN\svc-hopp, as
both (see Accounts).
Use update-database.ps1 from the dbscripts.zip download, after unblocking the
extracted files as described in Unblock the download.
Run it as the installing account (see Accounts). The same command
upgrades an existing database and installs a fresh one. To place the data and log files in
the locations above, create each database yourself first, then apply its database scripts; otherwise the command creates
it with the server's default file placement.
If your DBA runs the SQL, create the Utility and Migration databases empty first. Then generate one SQL file per database by
adding -DryRun -LogDir <folder> to each command above, run as a login that only reads (see
Permissions); nothing is changed. The DBA runs the Utility database's
file first, since a track database refers to it, then each Migration database's, as described in
Run the files.
Install the Runtime Agent
Run Hopp.Runtime.Agent.exe (the Runtime Agent installer) from the Hopp
download page. The installer first installs the .NET 10 Runtime if it is not
already present (downloading it on demand), then lays down the Agent MSI and
registers the Hopp Runtime Agent Windows Service under the chosen service account.
After the standard Welcome and license screens, the installer walks through three Hopp-specific dialogs, then ends with the standard install-folder step.
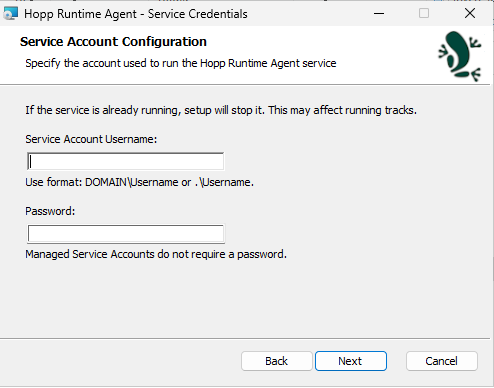
Service account
The Runtime Agent service runs under a dedicated Windows account. In a multi-server setup this is an Active Directory account.
Use the account you passed as -RuntimeAgentUser; in this guide's examples it is the
same account as the Portal's. The account needs full control of the Runtime folder
described above. The database scripts grant it db_owner on the Master, Repository,
Utility, Project and Migration databases; grant it db_owner on each Staging database
yourself. Accounts lists everything
each service account needs.
Specify the account in DOMAIN\User form. For a local account, use .\User (or the
machine name as the domain).
Portal connection
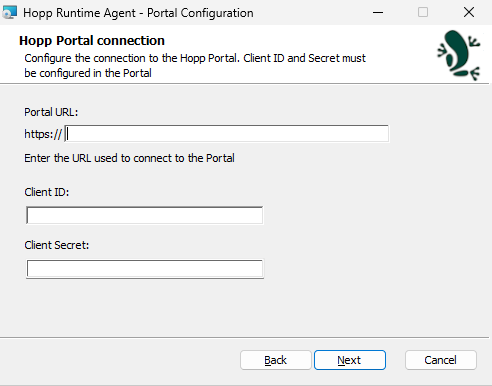
At startup the Agent fetches its runtime configuration from the Portal, including
the Hopp_Master connection string.
On this page, supply the public Portal URL of the Portal on the Master Server,
and the ClientId and ClientSecret of a client application you create ahead of
time on the Portal's Client Applications admin page. The Agent uses them to identify
itself to the Portal on each call.
Startup and shutdown commands (optional)
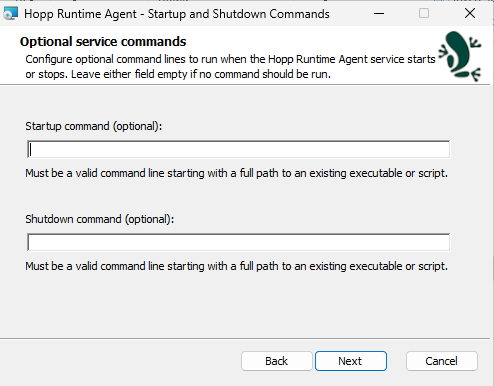
Optional programs the Agent runs when its service starts or stops. Enter the full path to an existing executable or script, without arguments: the Agent runs the path as it is, and skips a value it cannot find as a file. To pass arguments, point it at a wrapper script that supplies them. Leave either field empty when nothing should run.
Start the service
The installer installs the Hopp Runtime Agent service in Automatic start mode and, on its final screen, offers to start it under the configured
account. When the service starts it contacts the Portal at the configured URL,
fetches its runtime configuration, and is then ready to run the migration
processes the Portal launches.
Silent install via Hopp.Runtime.Agent.exe /quiet KEY=VALUE … is supported for
unattended provisioning. See Silent Install for
the property reference.
Install Runtime Connectors (optional)
To load source data straight from a SQL Server, Oracle or DB2 database (the Direct load loaders in
Loading Source Data),
install the matching Runtime Connector on each Execution Server from the download page:
Hopp.Connectors.SqlServer.msi, Hopp.Connectors.Oracle.msi or Hopp.Connectors.Db2.msi. The connectors are
not part of the Runtime Libraries you upload to the Portal; the Runtime finds them on the Execution Server
where it runs.
A Track that is already running finds a newly installed connector only after you restart the Track from the Portal Operations.